How to Enable Checkout on GlobalLinker Marketplace: Guide for Sellers
Ecommerce
3 week ago — 4 min read
Enabling checkout functionality on GlobalLinker Marketplace requires careful attention to detail and proper configuration. This comprehensive guide walks sellers through the prerequisite steps and final implementation process to ensure a quick and hassle free checkout enablement.
Prerequisites Before Enabling Checkout
1. Product Information Verification
There are two primary methods to verify product information:
(a) Individual Product Review
-
Access products through your the frontend of online store on the browser
-
Verify:
-
Product titles
-
Pricing
-
Descriptions
-
Visual elements
-
Additional information/long descriptions
(b) Bulk Review Process
-
Navigate to the seller panel and open the “Product” section
-
Locate and click "Download Products"
-
Review the downloaded Excel file, focusing on:
-
Product titles
-
Summary descriptions
-
Long descriptions
-
HS codes (mandatory)
-
Country of origin
-
Visibility settings (must be "Both" or "B2C")
2. Inventory Management
Updating Inventory Levels
-
Access the seller panel and open the “Product” section
-
Download the CSV file using the "Download CSV" button
-
Review and update:
-
Selling price (MRP)
-
Discounted price (if applicable)
-
Stock quantity
-
Upload the updated file using "Bulk Edit CSV"
3. Shipping Zone Configuration
Setting Up Shipping Zones
-
Navigate to Store Settings > Shipping
-
Configure zones with:
-
Zone names
-
Estimated delivery times
-
Geographic coverage
-
Cash on delivery (Optional)
-
Special handling requirements
-
Shipping charges
Weight Configuration for Setting Up Shipping Zone based on Order Weight
-
Download product CSV
-
Update product dimensions and weight
-
Upload via Bulk Edit CSV
4. Returns Policy Setup
Access through Store Settings > Returns and Cancellation to configure:
-
Return window duration
-
Auto-cancel settings
-
Return reasons
-
Cancellation reasons
-
Return policy documentation
Enabling Checkout on GlobalLinker Marketplace
Final Configuration Steps
-
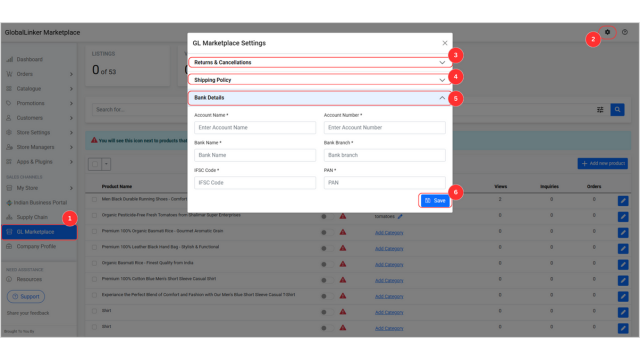
Access the seller panel
-
Navigate to GlobalLinker Marketplace
-
Click the settings icon
-
Configure:
-
Returns and cancellation options
-
Shipping policy
-
Input Bank Account details

Product Listing Process
-
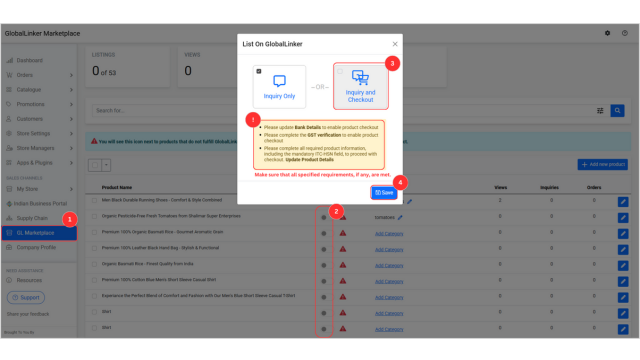
Select products for listing
-
Click "List on GlobalLinker"
-
Choose "Inquiry and Checkout"
-
Verify all requirements are met
-
Save changes

Best Practices
-
Maintain consistent pricing across platforms
-
Regularly update inventory levels
-
Keep shipping policies transparent
-
Ensure all product information is accurate and complete
-
Review and update return policies periodically
Technical Requirements
-
Valid GST verification
-
Complete bank details
-
Updated HS codes for all products
-
Proper category mapping
-
Accurate product weights and dimensions
This guide provides a comprehensive framework for sellers to successfully enable and manage checkout functionality on the GlobalLinker Marketplace platform. Following these steps ensures compliance with platform requirements and optimal customer experience.
Also read:
How to List on GlobalLinker Marketplace: A Step-by-Step Guide for Sellers
Posted by
GlobalLinker StaffWe are a team of experienced industry professionals committed to sharing our knowledge and skills with small & medium enterprises.
Network with SMEs mentioned in this article
View GlobalLinker 's profile
Most read this week


Comments (1)
Share this content
Please login or Register to join the discussion